วันอาทิตย์ที่ 4 สิงหาคม พ.ศ. 2556

Tuesday, June 18, 2013


Folder and Printer Sharing การแชร์โฟลเดอร์/เครื่องพิมพ์

                      by  Teacher   Phaitoon  Yaemprasuan
                             occupatech@gmail.com; picta55@gmail.com
                             http://picta55.blogspot.com

The Atmosphere of My 2003 Computer Class at 4th Floor of Building1.
They were energetic and very nice schoolkids I have ever experienced.

บรรยากาศห้องเรียนคอมพิวเตอร์  2546 สมัยยังอยู่ชั้น 4  อาคาร 1
พวกเขาเป็นเด็กนักเรียนที่ขยันขันแข็ง ตั้งใจเรียน และเป็นเด็กดีมากที่สุดรุ่นหนึ่งเท่าที่ครูเคยเจอ

All of us use Windows7 as the operating software, and our computers are connected together within the workgroup of the LAN (local area network). So we should gain the benefit of its sharing capability. Here we go!
ตอนนี้พวกเราล้วนแล้วแต่ใช้ Windows7 เป็นซอฟต์แวร์ระบบปฏิบัติการ (ในห้องเรียน และที่บ้านด้วย)  และเครื่องของพวกเราก็เชื่อมต่อกันเป็นเวิร์กกรุ๊ปในระบบแลน  ดังนั้นเราก็น่าจะใช้ความสามารถในการแชร์ทรัพยากรระหว่างกันได้  ลองดูกัน

1. FOLDER SHARING
        การแชร์โฟลเดอร์

Be sure we have to specify what folder that we want to share? 
ต้องระบุโฟลเดอร์ที่ต้องการแชร์


"BOOKS" is the folder of us to be shared.
โ
ฟลเดอร์ "BOOKS" คือโฟลเดอร์ที่เราอยากแชร์

 Make a right clicking with the folder, the dialogue box appears. Select the "Sharing" tab and the "Advanced Sharing" button
คลิกขวาที่โฟลเดอร์  กรอบโต้ตอบจะปรากฏขึ้น  เราก็เลือกแท็บ
"Sharing" และปุ่ม
"Advanced Sharing"


Now the folder has never been shared yet (Not Shared)
ตอนนี้โฟลเดอร์นี้มีสถานภาพไม่ได้ถูกแชร์ไว้

 Properties window of the folder appears and we should select to share it with others. Now we can see the maximum number of users to simultaneously enter to the folder is 20. Then we can click on the "Permission" button.
จะปรากฏหน้าต่างพรอพเพอร์ตีส์ (คุณสมบัติ) ของโฟลเดอร์นี้ขึ้นมา  และเราก็ต้องเลือกว่าจะแชร์กัน  และจะเห็นว่า เพื่อนๆ จะเชื่อมต่อเข้ามาใช้โฟลเดอร์ของเราพร้อมกันได้เต็มที่ 20 เครื่อง แค่นั้น  ต่อมาก็เลือกคลิกปุ่ม "Permission"

Tick the check-box, and we can change the share name or ignore it.
ติ๊กเลือกว่าจะแชร์  จะเปลี่ยน/หรือไม่เปลี่ยนชื่อที่จะแชร์ก็ได้

After clicking on the permission button, the Permissions window shows up, you can add any user e.g. "student" and you can change the permission type of the user.
หลังจากคลิกปุ่ม permission  จะมีหน้าต่างโผล่มาให้เราปรับเปลี่ยนตามความต้องการ

We can add user/ specify his permission level.
เราสามารถเพิ่มยูสเซอร์ / ระบุระดับการอนุญาตใช้งานโฟลเดอร์ของเราแก่เขา

Finally click on the "Apply" button, the folder now has been shared.
เมื่อเราคลิกปุ่ม "Apply" โฟลเดอร์ของเราก็ได้รับการแบ่งปันให้ใช้ร่วมกันได้ในเครือข่ายแล้ว

Well, our folder has been shared.
Folder ของเราได้รับการแชร์กันใช้เรียบร้อยแล้ว

Sample Special
ตัวอย่าง


This is from my computer (Its hostname is "ALPHA00".), when I click on the "Network" (at the left pane of Windows7 " computer explorer" ),  some computer hostnames appears.  Yes, I want to randomly select any hostname. If the target of mine is "KACHATUCH", well, I would make a double-click on it.
นี่เป็นคอมพิวเตอร์ของครูที่ห้องพักครู (โฮสต์เนมว่า ALPHA00)  เมื่อครูคลิกเลือก Network (อยู่ตรงแถบซ้ายของหน้าต่าง Computer explorer ของ Windows7 ก็จะปรากฏโฮสต์เนมต่างๆ ในเครือข่าย  แน่นอนว่า ครูก็คงต้องสุ่มเลือกเข้าไปใช้เครื่องใดสักเครื่อง  ที่ครูเล็งไว้ก็คือเครื่องที่มีโฮสต์เนมว่า Kachatuch

My Target Hostname is "KACHATUCH"
เครื่องที่ครูเล็งไว้คือ โฮสต์เนมที่ชื่อว่า Kachatuch

The shared folders of the hostname will be appeared. Then we can do a random selection and we can find any other subfolders that we can select to use.
ตอนนี้ก็จะเห็นโฟลเดอร์ที่โฮสต์เนม Kachatuch  เราก็คงต้องสุ่มเลือกโฟลเดอร์  แล้วเราก็จะเห็นโฟลเดอร์ย่อยๆ ที่เราสามารถจะเลือกเข้าไปใช้ได้

The Shared Folders of "Kachatuch" appears, any folder could be selected.
  If any shared folder had been selected its subfolders would be revealed. 

แชร์โฟลเดอร์ของโฮสต์เนม "Kachatuch" ก็จะปรากฏขึ้นมาให้เห็น เราสามารถเลือกโฟลเดอร์ไดก็ได้
ถ้าแชร์โฟลเดอร์ใดถูกเลือกเข้าใช้ โฟลเดอร์ย่อยๆ ก็จะได้รับการเปิดตัวออกมาให้เห็นฝเลือกใช้ได้


 2. PRINTER SHARING
        การแชร์พรินเตอร์


 Click the "Start button" of Windows7 desktop, the pop-up menu appears, then select "Devices and Printers", the target printer of us will be appeared.
จากปุ่ม Start ของ Windows7 เราก็เลือก "Devices and Printers"  ก็จะเจอพรินเตอร์ที่เราอยากจะแชร์กันใช้

Select the printer

 Make a right click on the printer icon, the select menu will show up, then select "Printers properties" option.  Then we can operate sharing easily.
คลิกขวาที่รูปพรินเตอร์ จะมีป็อปอัพเมนูโผล่ขึ้นมา ให้เราเลือก "Printers properties" ต่อจากนี้ เราก็คงจะปฏิบัติการแชร์พรินเตอร์ได้ไม่ยากแล้ว...

Select : Printer Properties

Click on the "Sharing tab", and we can rename the sharing printer.
เลือกแท็บ Sharing และสามารถเปลี่ยนชื่อพรินเตอร์ที่กำลังจะแชร์ได้ด้วย

Thursday, June 13, 2013


Internet Connection Problems ปัญหาการเชื่อมต่ออินเทอร์เน็ต


               by  Teacher  Phaitoon  Yaemprasuan   :   occupatech@gmail.com
                                                            http://picta55.blogspot.com

Sometimes the problems caused by unintentional human errors
บางทีนะ  ปัญหาก็เกิดจากความผิดพลาดที่ไม่เจตนาของคนเราเองนี่แหละ

Sometimes Internet connection problem can be our frustration. Rather than pressing F5-key and  trying to reload the website when we experience a problem, here are some ways we can troubleshoot the problem and identify the cause.
 บางครั้งปัญหาการเชื่อมต่ออินเทอร์เน็ตอาจกลายเป็นเรื่องความคับข้องใจเราได้เหมือนกัน  การกดแป้น F5 และการโหลดเว็บไซต์ใหม่ ก็อาจจะไม่เพียงพอ  แต่ถ้าเราพอจะมีประสบการณ์ในการแก้ปัญหาอยู่บ้าง ปัญหานี้ก็อาจจะคลี่คลายลงได้

Ensure we check the physical connections before getting too involved with troubleshooting. Anyone could have accidentally kicked the router or modem’s power cable or pulled an Ethernet cable out of a socket, causing the problem.
ก่อนอื่น เราต้องแน่ใจก่อนนะว่า กายภาพของการเชื่อมต่อ (the physical connections) ได้แก่ อุปกรณ์ สายสัญญาณ จุดเชื่อมต่อต่างๆ จักต้องอยู่ในสภาพปกติ ไม่มีใครไปสะดุดสายจนหลุด หรือดึงสายต่างๆ ออก

#    #     # 

Ping


Ping  (wikipedia.org) is a computer network administration utility used to test the reach-ability of a host on an Internet Protocol (IP) network and to measure the round-trip time for messages sent from the originating host to a destination computer.
ping เป็นคำสั่งที่ใช้บริหารจัดการ (administration utility) ระบบเครือข่ายคอมพิวเตอร์ ใช้เพื่อตรวจสอบการเข้าถึงเครื่องคอมพิวเตอร์ที่มีตัวตนจริงหรือโฮสต์ (host) ของเครือข่ายที่ใช้อินเทอร์เน็ตโปรโตคอล  เพื่อจะวัดเวลาของการสื่อสารไป-กลับ ระหว่างคอมพิวเตอร์ต้นทางและปลายทาง

The name comes from active sonar terminology which sends a pulse of sound and listens for the echo to detect objects underwater.
ชื่อนี้มีที่มาจากโซนาร์ sonar terminology ที่เรือดำน้ำใช้ส่งให้ไปกระทบวัตถุใต้น้ำ แล้วสะท้อนกลับมานั่นเอง

One of the first things to try when our connection doesn’t seem to be working properly is the ping command. Open a Command Prompt window from your "Start button" using the "cmd" command  and type a command like ping google.com .  
 สิ่งแรกที่เราควรทำ เมื่อการเชื่อมต่ออินเทอร์เน็ตของเราไม่เวิร์ก ก็คือ การใช้คำสั่ง ping โดยอาจจะเปิดหน้าต่าง command prompt ด้วยคำสั่ง cmd ณ Start Button แล้วพิมพ์คำสั่ง เช่น ping google.com . 

This command sends several packets to the address you specify. 
We can see that everything is working fine.
There’s 0% packet loss and the time each packet takes is fairly low.  

คำสั่ง ping จะส่ง packets (ข้อมูลในหน่วยวินาที) ไปยังเครื่องที่เป็นโฮสต์ปลายทาง 
จากภาพ จะเห็นว่า คำสั่งทำงานได้ดี  ไม่มีการสูญเสีย packet เลย  คือ ส่งไป 4 ได้คืน 4
และใช้เวลาน้อย 13-25 (เฉลี่ย 18) มิลลิวินาที 


  #    #     #

Modem & Router Issues

 Sometimes our modems or routers can cause the problem of Internet connection. A modem is a device that communicates with your Internet service provider (ISP), e.g. TOT, while the router shares the connection among all the computers and other networked devices in our home network. In my case (and also other students' cases ) , the modem and the router of mine is the same device, so it is called the "modem-router".
 บางครั้ง Modem หรือ Router ก็อาจจะเป็นปัญหาการเชื่อมต่ออินเทอร์เน็ตของเราก็ได้ 
Modem เป็นเครื่องมือในการสื่อสารกับผู้ให้บริการอินเทอร์เน็ต (Internet service provider : ISP)  อาทิ  TOT   สำหรับ Router เป็นอุปกรณ์ที่ทำหน้าที่แชร์การเชื่อมต่อระหว่างคอมพิวเตอร์และอุปกรณ์ต่างๆ ในระบบโฮมเน็ตเวิร์ก  กรณีของบ้านครูเอง (และบ้านนักเรียนกาญจนาฯ หลายคน) อุปกรณ์สองอย่างนี้จะเป็นตัวเดียวกัน มันเลยถูกเรียกว่า "modem-router"

 Let's take a look at the modem-router. If green lights are flashing on it, that’s normal and indicates network traffic. If we see a steady, blinking orange light, that generally indicates the problem. 

ลองดูสิว่า  modem-router ของบ้านเรา  มันมีไฟสัญญาณเป็นสีเขียวนิ่งๆ หรือเปล่า? ถ้าใช่ ก็แสดงว่า เครือข่ายโฮมเน็ตเวิร์กบ้านเราทำงานเป็นปกติดีไม่มีปัญหา  แต่ถ้าเราเห็นไฟสัญญาณเป็นสีอำพันกระพริบๆ ก็หมายความว่า โฮมเน็ตเวิร์กมีปัญหาแล้ว

All Green Lights Mean Normality
สัญญาณไฟเขียวตลอดแบบนี้ แสดงว่า ทุกอย่างปกติดี


If the lights indicate that either devices are experiencing a problem, try unplugging them and plugging them back in. This is just like restarting our computer. If we still experience problems, we may need to perform a factory reset on your router (to see its manual).
 หากไฟสัญญาณของ modem-router แสดงว่า มีปัญหา  ขอให้เราลองดึงปลั๊กไฟของมันออก แล้วเสียบกลับเข้าไปใหม่  ทำแบบนี้ก็ทำนองเดียวกับการที่เรา Restart คอมพิวเตอร์ใหม่นั่นแหละ  หากทำแล้วยังมีปัญหาอยู่  เราก็อาจจะต้องทำการรีเซ็ตอุปกรณ์นี้ใหม่ (ดูคู่มือก่อน) ให้กลับไปเป็นค่าที่ตั้งมาจากโรงงาน


#    #     #

Our Classroom102

What is about the problem when we are in the classroom? Because the IPaddress conflict can be occurred  anytime, so any computer in the classroom102 can be kicked off easily by the gateway computer of the Media Center which we have to lean on.
ปัญหาการเชื่อมต่ออินเทอร์เน็ตในห้องเรียนเป็นแบบไหน? ก็เพราะปัญหารหัสไอพีของเครื่องขัดแย้งกัน (IPaddress conflict) สามารถเกิดขึ้นได้ตลอดเวลา  ดังนั้นคอมพิวเตอร์ในห้องเรียน102 ก็มีสิทธิ์จะถูกดีดออกนอกระบบได้ไม่ยากจากเครื่องเกตเวย์ของศูนย์สื่อที่เราต้องพึ่งพาในการเชื่อมต่ออินเทอร์เน็ตนั่นเอง
 
Yes, we cannot connect to the Net directly but always request Internet sharing with the server computer of School Media Center through the local area network.
ใช่เลย  เราไม่ และไม่อาจเชื่อมต่ออินเทอร์เน็ตโดยตรงได้ นอกจากต้องพึ่งพาเครื่องคอมพิวเตอร์แม่ข่ายของศูนย์สื่อของโรงเรียน  (the server computer of School Media Center)  ผ่านระบบเครือข่ายแลน

There are variety kinds of computer in the classroom102, both old and new, big-name and no-name, useable and unusable
คอมพิวเตอร์ในห้องเรียน 102 มีหลายจำพวก ทั้งเก่าทั้งใหม่  ทั้งมียี่ห้อและไม่มียี่ห้อ  ที่ใช้ได้ก็มี ที่ใช้ไม่ได้ก็มี


Because any student can log on any computer in our classroom with the administrative account, so he has the full permissions to change/config anything about the network, then any problem can be occurred anytime.
เป็นเพราะนักเรียนสามารถจะล็อกออนเข้าใช้งานคอมพิวเตอร์ด้วยแอ็คเคาท์ของผู้ดูและระบบของเครื่องคอมพิวเตอร์นั้นๆ (the administrative account)  ก็เลยมีสิทธิ์เต็มร้อยที่จะเข้าไปปรับค่าต่างๆ ของระบบเครือข่ายของเครื่อง  ปัญหาก็อาจจะเกิดขึ้นได้ตลอดเวลา

Monday, June 3, 2013


Computer Network เครือข่ายคอมพิวเตอร์

TEACHER :  Phaitoon  Yaemprasuan    :  occupatech@gmail.com
                  http://picta55.blogspot.com


What is Computer Network? Why?

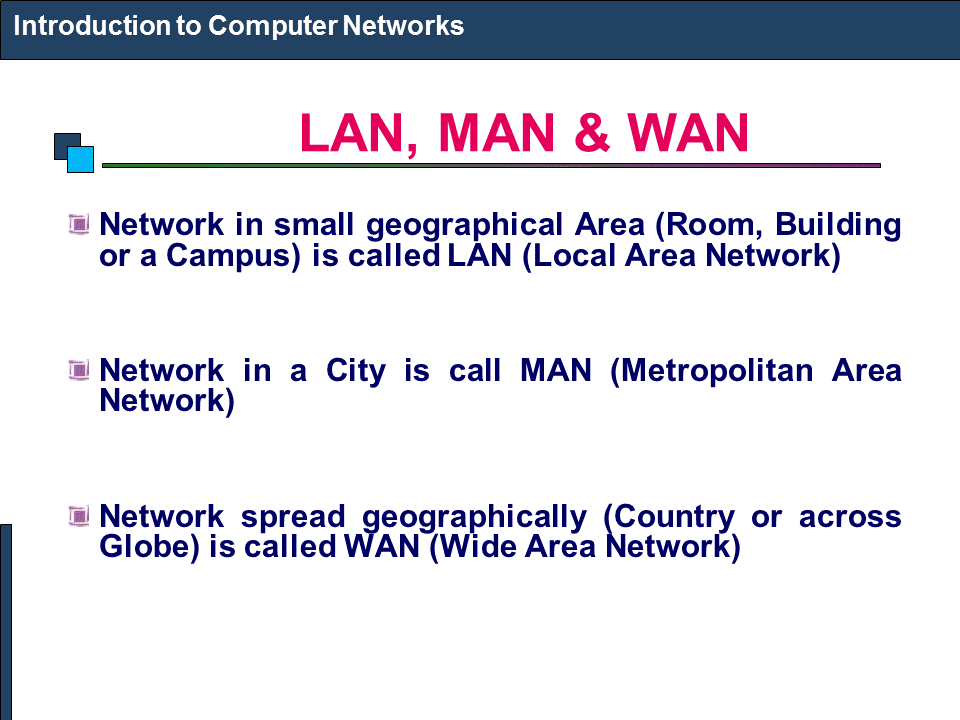
If any computer is not connected to others it is called "a stand-alone machine".  Today if anyone uses any stand-alone machine , he must be considered a stranger because the world today is of computer networks. A network machine can send/receive packets (bits of data per second) to/from any other machines e.g. Internet.  Our computers/tablet PCs/smart phones can never be alone anymore. Yes, they have been connected to their networks both local (e.g. the networks in our school) and global (e.g. Internet). We can share our resources such as  files, printers etc. to each other through our local area network (LAN) or we can exchange our data through the wide area network (WAN) like Internet.

เครือข่ายคอมพิวเตอร์คืออะไร? ทำไม?

ถ้าหากคอมพิวเตอร์เครื่องไหนไม่ได้เชื่อมต่อกับใคร มันจะถูกเรียกว่า "เครื่องที่โดดเดี่ยว" และถ้ามีคนใช้เครื่องคอมพิวเตอร์แบบนั้น ก็จะถูกมองว่าเพี้ยนหรือเปล่า?  เพราะโลกทุกวันนี้ได้กลายเป็นโลกของเครือข่ายคอมพิวเตอร์ไปเรียบร้อยแล้ว  เครืองคอมพิวเตอร์ที่เชื่อมต่อกับเครือข่าย จะสามารถส่ง/รับข้อมูล ไปสู่/จากเครื่องอื่นๆ  เช่น  อินเทอร์เน็ต  เครื่องคอมพิวเตอร์/แท็บเล็ต/สมาร์ตโฟน ของเรา จึงไม่อาจอยู่ได้อย่างเดียวดายอีกต่อไป  เพราะมันจักต้องถูกเชื่อมต่อเข้ากับระบบเครือข่าย  ทั้งเครือข่ายท้องถิ่น (เช่น เครือข่ายภายในโรงเรียนของเรา)  และเครือข่ายระดับโลก (เช่น อินเทอร์เน็ต)  เรายังสามารถแบ่งปันทรัพยากร อาทิ  ไฟล์ เครื่องพิมพ์  ให้กันและกันในเครือข่าย ผ่านระบบเครือข่ายเฉาะที่ (แลน) หรือเราสามารถแลกเปลี่ยนข้อมูลผ่านระบบเครือข่ายวงกว้างอย่างอินเทอร์เน็ตได้ด้วย


Figure 1   What is Computer Network  เครือข่ายคอมพิวเตอร์คืออะไร

Figure 2  Computer Network classified by Area Width
เครือข่ายคอมพิวเตอร์ จำแนกตามขนาดของพิ้นที่


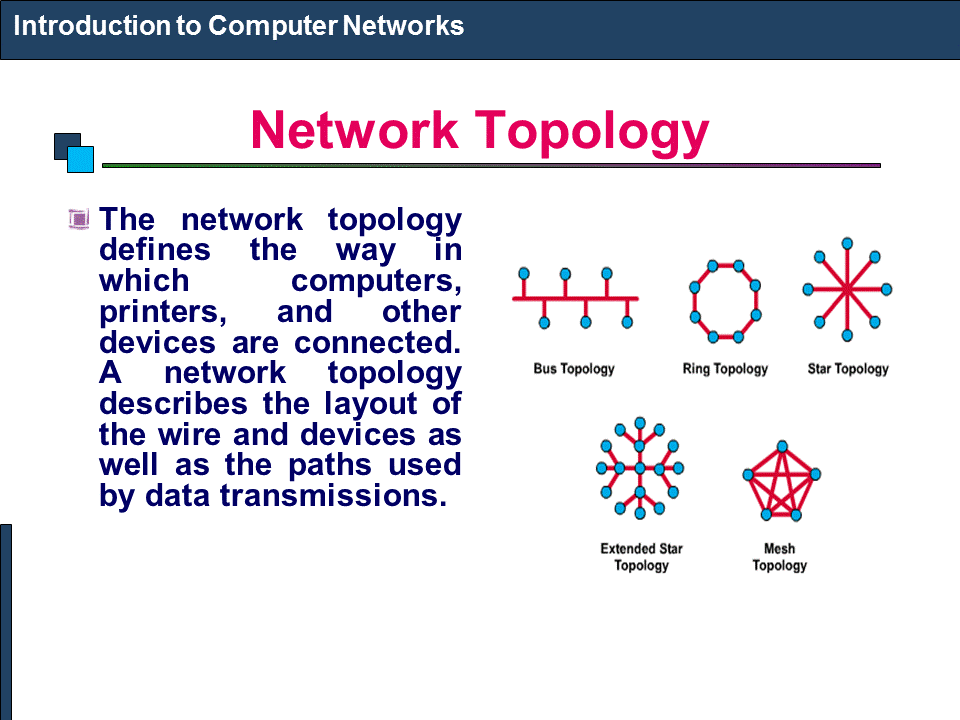
Figure 3  Types of Network Topology
รูปแบบการเชื่อมต่อของเครือข่าย


Figure 4   Star/Extended Star Topology
รูปแบบการเชื่มต่อแบบสตาร์ และแบบสตาร์หลายๆ กลุ่ม

Figure 5   The Server-Client Network What/How
เครือข่ายคอมพิวเตอร์แบบ แม่ข่าย-ลูกข่าย

::      ::      ::

What/How of the Network in Comp102 Classroom?

เครือข่ายคอมพิวเตอร์ ห้องเรียนคอมพ์102 เป็นแบบไหน/อย่างไร


Because the operating software (OS) of all computers in classroom-102 is Windows7, so any students who use them, those machines, should better understand how they work, especially how to use the network of them.

เพราะซอฟต์แวร์ระบบปฏิบัติการ (โอเอส) ของคอมพิวเตอร์ทุกเครื่องในห้องเรียน 102 คือ Windows7 ดังนั้นนักเรียนก็น่าจะต้องรู้ว่า มันมีวิธีการทำงานอย่างไร โดยเฉพาะระบบเครือข่าย 

 Our computers in comp102 classroom are connected together with the UTP (unshielded twisted pair) cables. Why? Because the unshielded cables are lower cost than the shielded cables which have been used in the signal noisy areas e.g.  airports, factories, etc. The style of their connection is "Star Topology" which each machine has its own cable which connects directly to the hub/switch.  A hub/switch is the center point of cables (both devices are similar to each other but a switch is more clever than a hub) . Well our network is called Local Area Network (LAN). Any LAN must has its workgroup name which required by the Operating System (OS) of each computer, Windows7 . But the administrator (the teacher) of this LAN  named it "comp2" workgroup. 

เครื่องคอมพิวเตอร์ในห้องเรียน 102 เชื่อมต่อด้วยสายเครือข่ายแบบ สายคู่บิดเกลียวไม่หุ้มฉนวน หรือสายยูทีพี ทำไมต้องเป็นสายแบบนี้?  เพราะราคาสายแบบนี้มันถูกกว่า สายเคเบิลแบบหุ้มฉนวน ที่ใช้กันในพื้นที่ที่มีการรบกวนสัญญาณมาก เช่น โรงงานในนิคมอุตสาหกรรม  ท่าเรือ ท่าอากาศยาน ฯลฯ และการที่ต้องบิดเป็นเกลียวก็เพื่อให้ป้องกันการรบกวนสัญญาณนั่นเอง  ซึ่งรูปแบบหรือโทโพโลยีของการต่อระบบแลน จะเป็นแบบสตาร์โทโพโลยี  นั่นคือเครื่องทุกเครื่องก็จะมีสายเคเบิลเป็นของตนเองไปโยงกับฮับ/สวิตช์ ที่ถือว่าเป็นจุดรวมศูนย์ของสายเคเบิลนั่นเอง (ทั้งสองอุปกรณ์ทำหน้าที่เหมือนกัน แต่สวิตช์จะมีความสามารถในการจัดการมากกว่า เช่น สายใดที่ไม่มีการเชื่อมต่อ สวิตช์มันก็จะตัดออกจากระบบ เป็นต้น)  ระบบเครือข่ายของเราเรียกว่า แลน  โดยแลนแต่ละวงจะต้องมีการกำหนดชื่อ เวิร์กกรุ๊ป ซึ่งของห้องเรียน 102 ครูผู้สอนกำหนดชื่อว่า comp2


The Teacher Teaches About Programming Using C-Language in Comp102 Classroom
ครูผู้สอน ขณะกำลังสอนเกี่ยวกับการโปรแกรมด้วยภาษาซี ณ ห้องเรียนคอมพ์102


::      ::      ::


If we consider only the "comp2-workgroup LAN", it is a peer-to-peer network that every machine is independent from each other but shares its files/folders/printers to its peers. On the other hand, when this workgroup connects to the server computer of "the School Media Center", it must be a client-server network. 

ถ้าพิจารณาเฉพาะเครือข่ายห้องเรียนคอมพ์102 มันจัดว่าเป็น เครือข่ายแบบ-เพื่อน-ถึง-เพื่อน หรือ peer-to-peer  นั่นหมายถึงว่า คอมพิวเตอร์แต่ละเครืองในวงแลนจะเป็นอิสระจากกันและกัน เพียงแต่มาร่วมกลุ่มกันแบบถ้อยทีถ้อยอาศัยกันในหมู่เพื่อนแค่นั้น  ในอีกทางหนึ่ง หากนำเอาวงแลนนี้ไปต่อเชื่อมกับเครื่องคอมพิวเตอร์แม่ข่าย หรือ server computer ที่อยู่ในห้องศูนย์สื่อ ของโรงเรียน  เครือข่ายก็จะกลายเป็นแบบ "แม่ข่าย-ลูกข่าย" หรือ Server-Client Network


What is about the client-server network? It means that the server computer of "the Media Center" is the manager/boss of other computers which are only the clients. The server computer has been installed with the operating-software-for-server such as Windows2003server/Windows2008server , Linux or  Unix, which can manage the client computers of the network. The clients have to obey the server because the latter has the power to control/ban the former. Yes, the clients can never control/manage the server.
 เครือข่ายแบบ Server-Client Network เป็นแบบใด? ก็หมายความว่า เครื่องคอมพิวเตอร์แม่ข่าย (Server) ของศูนย์สื่อคือ ผู้จัดการ/นาย ของเครื่องอืนๆ ที่มีสถานะเป็นแค่ลูกน้อง หรือClient แค่นั้น  การที่เครื่องเซิร์ฟเวอร์สามารถบริหารจัดการเครืองลูกข่ายของมันได้นั้น เพราะมันได้ติดตั้งซอฟต์แวร์ระบบปฏิบัติการแบบแม่ข่ายเอาไว้นั่นเอง อาทิ Windows2003server/Windows2008server , Linux หรือ  Unix ซึ่งเครื่องลูกข่ายจะต้องยอมให้ตนเองถูกจัดการได้ เพราะซอฟต์แวร์ระบบของเครื่องแม่ข่ายสามารถควบคุม/สั่งแบน เครื่องอื่นๆ ได้  ในขณะที่เครื่องอื่นๆ ไม่สามารถบริหารจัดการเครื่องเซิร์ฟเวอร์ได้นั่นเอง  

The Common Personal Computer that was installed with the Linux Server Operating System.
เครื่องพีซีบ้านๆ ที่เอามาทำเป็นเครื่องเซิร์ฟเวอร์  โดยนำมาติดตั้งระบบปฏิบัติการลีนิกซ์สำหรับเครื่องข่าย

Every machine in the network is required to have its unique "hostname" and "IP address".  Only the server computer has the "static IP-address" while the IP addresses of the client computers are "dynamic" specified/controlled by the sever. If the user of any client computer specify the static IP address himself, the server computer can never share the Internet connection because the "IP address conflict" problem could be occurred easily. Then the alien client will be kicked off /faded away from the network simultaneously. Yes, the server computer is the "Internet gateway" of the network.

คอมพิวเตอร์ทุกเครื่องต้องมีชื่อเฉพาะตัวที่ไม่ซ้ำใคร เรียกว่า Hostname  และต้องมีรหัสหมายเลขเครื่องกำกับไว้ เรียกว่า IP-address  และในเครือข่ายแลนก็จะมีแค่เพียงเครื่องแม่ข่ายหรือเซิร์ฟเวอร์เท้านั้น ที่มีรหัสไอพีแอสเดรสแบบคงที่ เรียกว่ามี static IP-address   ขณะที่ไอพีแอสเดรสของคอมพิวเตอร์ลูกข่ายทั้งหลาย จะไม่คงที่ หรือDynamic  ส่วนจะเป็นรหัสไอพีอะไรนั้น เครื่องเซิรฟเวอร์จะเป็นตัวจัดการให้เอง โดยยึดหลัก FIFO (First In, First Out) ก็หมายความว่า เครื่องลูกข่ายตัวไหนเชื่อมต่อกับเครื่องเซิร์ฟเวอร์ก่อนก็จะๆด้รับการจ่ายรหัสไอพีให้ก่อน-หลัง ตามลำดับไป  แต่ถ้าเครื่องคอมพิวเตอร์ลูกข่ายตัวไหนไปดำเนินการกำหนดรหัสไอพีแอสเดรสของตัวเองเป็นแบบคงที่ละก็ คอมพิวเตอร์เครื่องนั้นๆ ก็จะถูกเครื่องเซิร์ฟเวอร์เฉดหัวออกไปจากระบบ มิเช่นนั้นอาจจะทำให้เกิดปัญหารหัสไอพีชนกันได้ในระบบ และเครื่องเซิร์ฟเวอร์ในฐานะเกตเวย์หรือทางออกสู่อินเทอร์เน็ตของระบบ ก็จะไม่ยอมแบ่งปันการเชื่อมต่ออินเทอร์เน็ตให้กับเครื่องนั้นๆ 

OK., after selecting the "Local Area Network" option, the "Local Area Network Connection Status" window appears. You can see its speed of packets transmission (100 Mbps) , bytes of the sent/received packets. 

หลังจากที่นักเรียนเลือก  "Local Area Network" หน้าต่างที่ชื่อ "Local Area Network 
Connection Status" ก็จะโผล่หน้ามาให้ยล ตรงนี้แหละนักเรียนก็จะเห็นได้ว่า ความเร็วของเครือข่ายเราขนาดไหนในการส่งแพ็คเก็ตส์ (จำนวนบิตของข้อมูลในหน่วยวินาที) ความเร็วระดับมดวิ่งนั่นแหละ แค่สัก 100 ล้านบิตต่อวินาที อย่าลืมว่า ตั้ง 8 บิต จึงจะได้ไบต์


Then, when you click on the "Properties" button, another window shows. To find and select the "Internet Protocol Version) option, you can see its IPaddress has been obtained automatically by the gateway/server computer (of the School Media Center).

ต่อจากนั้นเราก็คลิกปุ่ม properties เราจะพบว่า เครื่องลูกข่ายที่เราใช้อยู่ จะถูกจ่ายรหัสไอพีให้แบบอัตโนมัติ ตามที่กล่าวมาแล้ว (ถ้าจะปรับเป็นรหัสคงที่ก็ต้องมาปรับตรงนี้) แต่ปกติจะตั้งไว้ตามรูปนั่นแหละ


::      ::      ::

Another one I would like to refer to is "protocol". What is it?  A protocol (www.wikipedia.org) is a system of digital message formats and rules for exchanging those messages in or between computing systems and in telecommunications.  And in our network we use the TCP/IP (comes from "Transmission Control Protocol and Internet Protocol).  Now Thailand uses IPv4 protocol, but Thai government by Prime Minister Yingluck Shinawatra is going to change the Internet protocol of the country with another version, IPv6 protocol, which has more capacity and efficiency of transmission. 


มีอีกเรื่องที่ครูอยากจะพูดถึงก็คือ "โปรโตคอล" มันคืออะไร?  ถ้่าจะว่าไปนะ คำๆ นี้ มันเป็นภาษาที่ใช้ในวงการฑูตเขา คือกรณีที่ต้องมีการติดต่อสื่อสารกันระหว่างพวกฑูตของประเทศต่างๆ เขาก็จะต้องมีวิธีการ มาตรฐาน ระบบระเบียบต่างๆ ที่เข้าใจตรงกัน และเขาเรียกว่า protocol ทางวงการคอมพิวเตอร์ก็ไปขอยืมคำศัพท์ของเขามาใช้บ้าง  โปรโตคอลของเครือข่ายคอมพิวเตอร์ (www.wikipedia.org) ก็คือ ระบบของรูปแบบข่าวสารเชิงดิจิตอลและกติกา ของการแลกเปลี่ยนกันระหว่างระบบคอมพิวเตอร์และโทรคมนาคม  ซึ่งทุกวันนี้ โปรโตคอลที่เราใช้ในเครือข่ายนั้น คือ ทีซีพี/ไอพี (โปรโตคอลควบคุมการส่งข้อมูล และอินเทอร์เน็ตโปรโตคอล)  และ ตอนนี้รัฐบาลไทย ภายใต้การนำของ ฯพณฯ ยิ่งลักษณ์ ชินวัตร  ก็กำลังปรับเปลี่ยนอินเทอร์เน็ตโปรโตคอลของประเทศเรา ที่ขณะนี้เป็นเวอร์ชัน 4 ให้เป็นเวอร์ชั่น 6  เพื่อรองรับปริมาณของเครือข่าย และประสิทธิภาพที่ขยายเพิ่มขึ้น

Sunday, June 2, 2013


How to Create Your Blog with www.blogger.com สร้างบล็อกอย่างไร

                         Teacher Phaitoon  Yaemprasuan   : occupatech@gmail.com

                                                              http://picta55.blogspot.com

They are energetic schoolkids who love to learn and learn to develop their competencies.
พวกเขาเป็นนักเรียนที่เอางานเอาการ รักการเรียน และเรียนรู้ที่จะพัฒนาสมรรถนะในการเรียนของตนเอง


1. After you had signed in Google Mail Service and then you had your own Gmail, well, you are now the one who can ask for your blog creation with www.blogger.com using your Gmail.

หลังจากที่นักเรียนได้ไปลงทะเบียนขอมี Gmail account กับ Google แล้ว  นักเรียนก็สามารถเข้าไปขอสร้าง Blog กับ blogger.com โดยใช้ Gmail address ที่นักเรียนขอไว้แล้วนั่นเอง  [Gmail และ Blogger เป็นของ Google เหมือนกัน จึงไปกันได้ด้วยดี)


2. After entering your Gmail with its password, the "Welcome Screen" of Blogger appears and confirms that you have just passed its regulation. Now you can either add your profile details or skip to the next step.
ถ้ากรอกถูกต้อง นักเรียนก็จะมาพบกับหน้าจอ ตอบรับของ blogger  ตรงนี้นักเรียนอาจจะเพิ่มรายละเอียดเกี่ยวกับตัวเองลงไปใน Profile ก็ได้  หรืออาจจะข้ามไปก็ได้

You can give more details of your profile or you can skip to the next step by clicking the orange button.

3. See "New Blog" and click, wow, to create your blog any way!!!
หลังจากนั้นก็จะเข้าสู่หน้าจอที่บอกว่า ให้นักเรียนสร้างบล็อกได้  ก็ทำง่ายๆ เพียงแค่คลิกที่ "บล็อกใหม่" 


4. Yeah!, you have to fill some fields related to your new blog e.g.   title, address and  template. But you can pass this task easily. Or you can skip it. (Because you can change these options any time).
 หลังจากที่คลิกบล็อกใหม่  นักเรียนก็จะมาพบกับหน้าจอที่เขียนว่า รายการบล็อก  นักเรียนก็จะต้องกรอกที่อยู่ของบล็อก  ซึ่งนักเรียนก็กรอกตามที่ครูกำหนด คือเลขประจำตัว 4 หลัก ตามด้วยตัวอักษรของชื่อ  ในภาพเป็นบล็อกของครูที่ทำเป็นตัวอย่าง  (ของนักเรียนต้องดูภาพล่างถัดจากภาพนี้) 


===> เมื่อกรอกถูกแล้วก็ยืนยันว่า สร้างบล็อก


5. You can select "Settings Option" to change the style/template of your blog anyway and anytime.
นักเรียนสามารถเปลี่ยนแปลงสิ่งที่กำหนดไว้ของบล็อกได้  โดยไปเลือกที่การตั้งค่า
หรือเปลี่ยนรูปแบบ/แม่แบบ ก็ยังได้  (ดังรูปข้างล่างนี้)


6. Well, you can start your post now.  See the sample below.
ลงมือสร้างบทความ (POST)  ดังตัวอย่าง หลังจากนั้นก็เผยแพร่ (Publish)


7.  When you select the option "View Blog", your blog with your post will appears like the following.

เมื่อเราเรียกดูบล็อก (View blog)  ก็จะมีหน้าตาทำนองนี้ ดังตัวอย่าง


======================================================================

There are any students complain that they have no Internet connection at home, so they can never create their blog. The teacher realizes the problems. But the cops (the fans of Liverpool Football Club) say, "You'll never walk alone", be sure you still have friends who can help you. Look for a star that guides you to the way out.

มีนักเรียนส่วนหนึ่งมาปรับทุกข์ว่า ที่บ้านไม่มีอินเทอร์เน็ตใช้ เลยไม่อาจจะสร้างบล็อกได้  เรื่องนี้ครูผู้สอนเองก็ตระหนักอยู่แล้ว  แต่ช้าก่อน.... สาวกหงส์แดง หรือพวกเดอะค็อป (แฟนคลับสโมสรลิเวอร์พูล) บอกเป็นเสียงเดียวกันว่า "คุณ..จะไม่มีวันได้เดินเผชิญเหตุคนเดียว.."  (เพราะพวกเราจะเดินไปพร้อมๆ กัน ช่วยเหลือกัน ไม่ทิ้งกัน..น่ะสิ)  ... เพราะฉนั้นนักเรียนที่ไม่มีอินเทอร์เน็ตที่บ้าน... ก็ไม่ใช่ประเด็นที่เป็นปัญหา... เพราะว่า เราก็ยังมีเพื่อนๆ.. เพื่อนๆ ที่พร้อมจะช่วยเหลือเรา ...เพียงแต่เราต้องหา... ดาวดวงนั้น (เพื่อนสักคน) ให้เจอ  ดวงดาวที่จะช่วยนำเราไปสู่ทางออก..

======================================================================

YOU ARE EXPECTED TO START CREATING YOUR BLOG NOW.
Please don't say "never" again, do you?


ก็หวังว่า นักเรียนคงจะสามารถสร้างบล็อกเบื้องต้นได้แล้ว ขอเพียงแต่ว่า ต้องรีบไปทดลองทำทันที  ถ้านักเรียนมัวผลัดวันประกันพรุ่ง ครูรับรองว่า นักเรียนก็จะยังทำไม่ได้  หรือ "ไม่ได้ทำ"

Saturday, June 29, 2013


Visual Basic 6.0 : Exercise 2 " Pizza Order"


     Teacher  Phaitoon  Yaemprasuan  :   occupatech@gmail.com
                                                                http://picta55.blogspot.com


Exercise 2

Pizza Order Application

 We had just learned about programming with Microsoft Visual Basic 6.0 and tried to create two Windows applications (using Visual Basic 6.0), the first one was "Stop Watch" and the second was "Calendar/Time".  Some people have told me, the teacher, that it is interesting and challenging, while some other people have never said any word but have just thought that it is boring. Yes, the teacher realizes that programming is so valuable because it can develop anyone both systematic thinking and solving. Well, the teacher knows  that anybody can never hand on it if he is not interested in programming. But, now the teaching is not over, the show must go on! 
พวกเราได้เรียนรู้เกี่ยวกับการโปรแกรมด้วยภาษาวิชวลเบสิก 6.0  และได้ลองพัฒนาแอ็ปปลิเคชันที่ทำงานในระบบวินโดวส์ 2 แอ็ป ด้วยกัน  โดยแอ็ปแรกเป็นนาฬิกาจับเวลา แอ็ปที่สองเป็นแอ็ปบอกวันเวลา  นักเรียนหลายคนก็บอกกับครูว่า "น่าสนใจและท้าทายมาก"  ขณะที่นักเรียนอีกหลายคนไม่พูดอะไรสักแอ่ะ...คิดอยู่อย่างเดียวว่า "มันน่าเบื่อ"   ใช่เลย..ครูตระหนักดีอยู่เสมอว่า ความจริงแล้วนะ.. การเรียนรู้เรื่องการโปรแกรมมันมีคุณค่าในตัวของมันเองอยู่แล้ว  เพราะมันเป็นการพัฒนาผู้เรียนให้รู้จักการคิด/การแก้ปัญหาอย่างเป็นระบบ  ครู..ทราบดีว่า.. นักเรียนคนไหนก็ตามที่รู้สึกว่าตนเองไม่สนใจในเรื่องของการโปรแกรมแล้วละก็ คงยากนะที่จะเอาดีในเรื่องนี้ได้ ... แต่ช้าก่อน... การเรียนการสอนก็คงหยุดไม่ได้ ... ก็ต้องว่ากันต่อไป..


  "Pizza Order" Application
แอ็ปปลิเคชัน "สั่งพิซซ่า"

     SOURCE  :   www.kidwares.com

1. Start a new project.  We'll build a form where a pizza order can be entered by simply clicking on check boxes and option buttons.
ให้นักเรียนเข้าไปที่หน้าจอหลักของ Microsoft Visual Basic 6.0 เหมือนที่เราเคยทำ ด้วยการเลือก Standard EXE เพื่อสร้าง New project .... อย่าลืม Save นะ  ซึ่งการ Save ครั้งแรก จะเป็น Save As โดยนักเรียนต้อง Save ฟอร์มก่อน แล้วจึง save โปรเจ็กต์ ... เลือก Folder ให้เรียบร้อย  (เรื่องนี้ นักเรียนถูกย้ำมาจนเป็นทักษะดีอยู่แล้วจากครูผู้สอน)  ตอนนี้เรากำลังจะสร้างแอ็ปสั่งพิซซ่า  โดยผู้ใช้ก็แค่ทำการคลิกเลือกตัวเลือก และติ๊กรายการต่างๆ แล้วสั่งการผ่านปุ่มคำสั่ง..

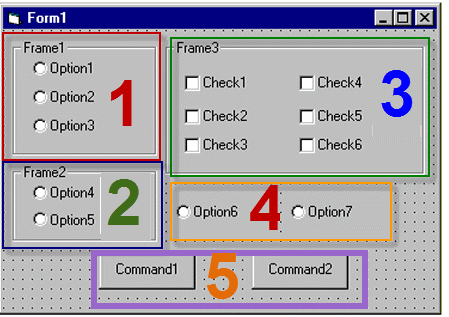
2. Draw three frames.  In the first, draw three option buttons, in the second, draw two option buttons, and in the third, draw six check boxes.  Draw two option buttons on the form.  Add two command buttons.  Make things look something like this.
ให้นักเรียนวาดเฟรม (frame) 3 เฟรม  แล้ววาดปุ่มอ็อปชัน (option button) ใส่ไว้ในเฟรมแรก 3 ปุ่ม  ส่วนเฟรมที่สองวาดปุ่มอ็อปชันใส่ไว้ 2 ปุ่ม  ส่วนเฟรมที่สามวาด check box ใส่ไว้ 6 ช่อง ด้วยกัน  แล้ววาดปุ่มอ็อปชันอีกสองปุ่มใส่ไว้ในฟอร์ม (ดูโซน 4 ประกอบ)  และวาด command button (ปุ่มคำสั่ง) สองปุ่ม (ไว้ในโซน 5)

Fig.1  The Form which is being designed by us.
นี่เป็นฟอร์มที่กำลังได้รับการออกแบบจากนักเรียน


3. Set the properties of the form and each control.
หลังจากออกแบบเสร็จแล้ว ต่อไปนักเรียนต้อง set the properties (ตั้งค่าคุณสมบัติ) ของฟอร์ม และคอนโทรล (control )แต่ละตัว  ดังนี้


  • Form1:
    BorderStyle    1-Fixed Single
    Caption          Pizza Order
    Name            frmPizza
  • Frame1:
    Caption    Size

  • Frame2:
    Caption    Crust Type

  • Frame3
    Caption    Toppings


  • Option1:
    Caption    Small
    Name      optSize
    Value      True

  • Option2:
    Caption    Medium
    Name      optSize (yes, create a control array)

  • Option3:
    Caption    Large
    Name      optSize

  • Option4:
    Caption    Thin Crust
    Name       optCrust
    Value       True

  • Option5:
    Caption    Thick Crust
    Name       optCrust (yes, create a control array)

  • Option6:
    Caption    Eat In
    Name    optWhere
    Value    True

  • Option7:
    Caption    Take Out
    Name       optWhere (yes, create a control array)

  • Check1:
    Caption    Extra Cheese
    Name      chkTop

  • Check2:
    Caption    Mushrooms
    Name       chkTop (yes, create a control array)

  • Check3:
    Caption    Black Olives
    Name       chkTop


  • Check4:
    Caption    Onions
    Name      chkTop

  • Check5:
    Caption    Green Peppers
    Name      chkTop

  • Check6:
    Caption    Tomatoes
    Name      chkTop

  • Command1:
    Caption    &Build Pizza
    Name      cmdBuild

  • Command2:
    Caption    E&xit
    Name      cmdExit


4. Declare the following variables in the general declarations area:
ให้นักเรียนเลือก View/Code   แล้วพิมพ์ Source codes ในส่วนของ  general declarations (ส่วนประกาศทั่วไป)     เพื่อประกาศตัวแปร (to declare the variables) 3 ตัว เป็นตัวแปรชนิด String (เก็บข้อมูลที่เป็นข้อความ)  ได้แก่  PizzaSize (เก็บข้อมูลขนาดของพิซซ่าที่ลูกค้าสั่ง),  PizzaCrust (เก็บข้อมูลว่า ลูกค้าสั่งพิซซ่าที่มีขอบบางหรือหนา),   PizzaWhere (เก็บข้อมูลว่า พิซซ่าที่ลูกค้าสั่งนั้น จะกินที่ร้าน หรือแพ็กห่อ)

    Option Explicit
      Dim PizzaSize As String
      Dim PizzaCrust As String
      Dim PizzaWhere As String


5. Attach this code to the Form_Load procedure.  This initializes the pizza size, crust, and eating location.
ให้นักเรียนผูกโค้ด (attach code) เข้ากับฟอร์ม  (โดยการทำดับเบิลคลิกที่ฟอร์ม  ก็จะเข้าสู่โมดูล หรือโพรซิเยอร์ (procedure) ที่ชื่อ Form_Load แล้วนักเรียนก็ใส่โค้ดเข้าไป  บรรดาโค้ดตรงนี้ จะเป็นการกำหนดค่าเริ่มต้น (initialization) ให้กับตัวแปรทั้งสามตัว ที่เราประกาศไว้ คือ PizzaSize, PizzaCrust และ PizzaWhere

Private Sub Form_Load()
  PizzaSize = "Small"
  PizzaCrust = "Thin Crust"
  PizzaWhere = "Eat In"
End Sub


6.  Attach this code to the three option button array Click events.  Note the use of the Index variable:
ให้นักเรียน attach code เข้ากับปุ่มอ็อปชันในแต่ละเฟรม (โดยดับเบิลคลิกที่ปุ่มอ็อปชันใดๆ ในเฟรมนั้น แล้วใส่โค้ด)


Private Sub optSize_Click(Index As Integer)
[ดับเบิลคลิกที่ปุ่ม optSize (ใดก็ได้ในสามปุ่ม ของโซน 1) แล้วใส่โค้ดข้างล่างนี้เข้าไป ]
  PizzaSize = optSize(Index).Caption
  (โค้ดนี้ จะให้อ่านค่า จำนวนเต็ม 0, 1 หรือ 2 ซึ่งแทนขนาดเล็ก กลาง ใหญ่  ของขนาดถาดพิซซ่า เอาค่าไปเก็บไว้ในตัวแปร PizzaSize)
End Sub

Private Sub optCrust_Click(Index As Integer)
[ดับเบิลคลิกที่ปุ่ม optCrust (ใดก็ได้ในสองปุ่ม ของโซน 2) แล้วใส่โค้ดข้างล่างนี้เข้าไป ] 
  PizzaCrust = optCrust(Index).Caption
  (โค้ดนี้ จะให้อ่านค่า จำนวนเต็ม 0 หรือ 1 ซึ่งแทนขอบพิซซ่า อย่างบาง หรืออย่างหนา  เอาค่าไปเก็บไว้ในตัวแปร PizzaCrust)
End Sub

Private Sub optWhere_Click(Index As Integer)
[ดับเบิลคลิกที่ปุ่ม optWhere (ใดก็ได้ในสองปุ่ม ของโซน 4) แล้วใส่โค้ดข้างล่างนี้เข้าไป ] 
   PizzaWhere = optWhere(Index).Caption
    (โค้ดนี้ จะให้อ่านค่า จำนวนเต็ม 0 หรือ 1 ซึ่งแทนว่าจะกินพิซซ่าที่ไหน กินที่ร้าน หรือนำกลับบ้าน  เอาค่าไปเก็บไว้ในตัวแปร PizzaWhere)
End Sub


7. Attach this code to the cmdBuild_Click event.
ให้นักเรียน attach code ต่อไปนี้  เข้าไปที่ปุ่มคำสั่ง cmdBuild

Private Sub cmdBuild_Click()
  Dim Message As String
  Dim I As Integer
  Message = PizzaWhere + vbCr
  Message = Message + PizzaSize + " Pizza" + vbCr
  Message = Message + PizzaCrust + vbCr
        For I = 0 To 5
  If chkTop(I).Value = vbChecked Then Message = Message + chkTop(I).Caption + vbCr
      Next I
      MsgBox Message, vbOKOnly, "Your Pizza"
End Sub


This code forms the first part of a message for a message box by integrating the pizza size, crust type, and eating location (vbCr is a symbolic constant representing a ‘carriage return’ that puts each piece of ordering information on a separate line).  Next, the code cycles through the six topping check boxes and adds any checked information to the message.  The code then displays the pizza order in a message box.
โค้ดในส่วนนี้ จะทำการสร้าง message ในลักษณะของ message box  ที่จะบูรณาการเอา ขนาดของพิซซ่า  ขอบหนาหรือบาง และจะกินที่ร้านหรือแพ็กกล่อง (vbCr คือ symbolic constant หรือค่าคงที่ ในภาษาวิชวลเบสิกที่หมายถึงการสั่งให้ขึ้นบรรทัดใหม่ หรือ carriage return ก็คือ "การปัดแคร่" ซึ่งขอยืมศัพท์ของพิมพ์ดีดมาอีกทีนั่นเอง)


8.  Attach this code to the cmdExit_Click event.
ผูกคำสั่ง End เข้ากับปุ่มคำสั่ง cmdExit
Private Sub cmdExit_Click()
  End
End Sub


9.  Run the application, the message box will be appeared.
เมื่อรันโปรแกรม ก็จะได้ application ที่มี user interface แบบนี้


The Application User Interface
นี่คือหน้าตาของแอ็ปปลิเคชันของเรา


Message Box
เม็ซเสซบ็อกซ์ที่ได้